
Installation of NetBSD 7 on the Raspberry Pi 2
Various Linux distributions and Unix derivates support the Raspberry Pi single-board computer. NetBSD 7 is a free and open-source Unix operating system that also runs on the ARMv7 architecture of the Raspberry Pi 2.

Preparing the microSDHC Memory Card
An image file is available for download on the NetBSD servers. Fetch the compressed image and unzip it:
$ fetch http://ftp.netbsd.org/pub/NetBSD/NetBSD-7.1/evbarm-earmv7hf/binary/gzimg/armv7.img.gz
$ gunzip armv7.img.gz
Just write the image to your microSDHC memory card:
$ dd if=armv7.img of=/dev/da0 bs=2m
Replace /dev/da0 with the device node of your card reader.
First Boot
After the first power-on, the disk will be enlarged to the size of the memory
card automatically. This may take some minutes. You can then login as
root. Most likely, you want to set a password for root
now:
# passwd
Create an additional account and add the user to the group
wheel:
# useradd -m -G wheel openadms
# passwd openadms
System Configuration
It is recommended to edit /etc/rc.conf and add some settings to
extend the life time of the memory card:
syslogd=NO
manpagedb=NO
savecore=NO
virecover=NO
fsck_flags="-P -p -y"
Slices with many write operations, like /tmp,
/var/tmp, /var/log, and /var/run, should
be better moved to the system memory using tmpfs. Edit
/etc/fstab and add:
tmpfs            /tmp        tmpfs    rw,-sram%30
tmpfs            /var/tmp    tmpfs    rw,-sram%10
tmpfs            /var/log    tmpfs    rw,-sram%10
tmpfs            /var/run    tmpfs    rw,-sram%1
You may want to deactive swap memory. Add to /etc/rc.conf:
no_swap=YES
Keyboard Layout
The keyboard layout can be changed to German with:
# wsconsctl -k -w encoding=de
To make the changes permanent, edit /etc/wscons.conf and
add:
encoding de
You may notice that the backspace key does not work. Instead, we have to
press ^H (Ctrl + H). As a workaround, you
can either use tcsh or remap the keys with wscons:
# wsconsctl -w map+="keycode 14 = BackSpace" > /dev/null
# wsconsctl -w map+="keycode 211 = Cmd_ResetEmul Delete" > /dev/null
Add the commands to /etc/rc.local to make them permanent.
Shell
The default shell of NetBSD is sh. You can change it to
csh or install tcsh, mksh, or any other
shell as a package:
# chsh -s /bin/csh
# chsh -s /usr/pkg/bin/tcsh
# chsh -s /usr/pkg/bin/mksh
Sendmail
The root account gets syslog messages from sendmail which
can be read with mail. If you do not wish do receive logs by mail,
disable sendmail by editing /var/cron/tabs/root and removing |
sendmail -t:
15    3    *    *    *    /bin/sh /etc/daily 2>&1 | tee /var/log/daily.out
#15   3    *    *    *    /bin/sh /etc/daily 2>&1 | tee /var/log/daily.out | sendmail -t
30    4    *    *    6    /bin/sh /etc/weekly 2>&1 | tee /var/log/weekly.out
#30   4    *    *    6    /bin/sh /etc/weekly 2>&1 | tee /var/log/weekly.out | sendmail -t
You may want to alter aliases(5) to create an alias for the mail
account (for example, a file).
Time Zone
The system clock can be set to local time. Please be aware of time jumps if
you use a local time zone like Europe/Berlin. To avoid the Central
European Summer Time (CEST), you can set the zone to GMT+1 instead:
# ln -fs /usr/share/zoneinfo/Etc/GMT-1 /etc/localtime
Because of the POSIX convention, Etc/GMT-1 is the name of GMT+1
on Unix. If you like to switch to daylight saving time, set:
# ln -fs /usr/share/zoneinfo/Europe/Berlin /etc/localtime
NTP
Use the Network Time Protocol (NTP) to synchronise your system clock with a
remote time server. Edit /etc/rc.conf and add:
ntpdate=YES
ntpdate_hosts="0.de.pool.ntp.org"
ntpd=YES
The list of time servers can be changed in /etc/ntp.conf. Run
ntpdate -u 0.de.pool.ntp.org to update the time instantly.
WiFi Network
WiFi connections can be established with wpa_supplicant. Add your
network configuration to /etc/wpa_supplicant.conf:
ctrl_interface=/var/run/wpa_supplicant
ctrl_interface_group=wheel

network={
    ssid="my_wifi"
    scan_ssid=1
    key_mgmt=WPA-PSK
    psk="my_passphrase"
}
Edit /etc/rc.conf to activate WiFi at boot time:
dhclient=YES
dhclient_flags="-nw"

wpa_supplicant=YES
wpa_supplicant_flags="-B -i ath0 -c /etc/wpa_supplicant.conf"
You have to change ath0 to the name of your network interface
controller. Use wpa_cli to establish a connection:
# wpa_cli reconfigure
# wpa_cli status
Packages
You can use pkgsrc to compile
applications from source code or use pre-compiled binary packages. Due to the
limited resources of the Raspberry Pi, it is recommended to use packages. NetBSD
features two tools to install packages: pkg_add is part of the base
system and pkgin can be used additionally.
For both tools, the path to the package repository has to be set at first:
# setenv PKG_PATH "ftp://ftp.NetBSD.org/pub/pkgsrc/packages/NetBSD/earmv7hf/7.1/All"
Add the path to /root/.cshrc:
setenv PKG_PATH "ftp://ftp.NetBSD.org/pub/pkgsrc/packages/NetBSD/earmv7hf/7.1/All"
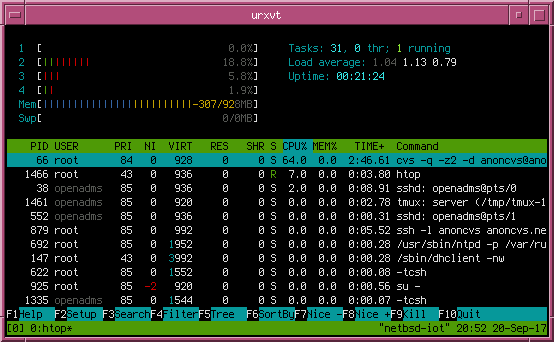
tmux and htop on NetBSD 7.1,
installed with pkginpkg_add
New packages can be installed with pkg_add simply by
running:
# pkg_add mozilla-rootcerts
# pkg_info
# rehash
# mozilla-rootcerts install
pkgin
You have to install pkgin first:
# pkg_add pkgin
Then, add the repository, update the local database, and install your packages:
# echo ftp://ftp.NetBSD.org/pub/pkgsrc/packages/NetBSD/earmv7hf/7.1/All > /usr/pkg/etc/pkgin/repositories.conf
# rehash
# pkgin update
# pkgin install mozilla-rootcerts vim tmux git
Please refer to the official documentation for further information.
pkgsrc
For more recent software versions, you have to use pkgsrc and compile your packages from source. You can bootstrap it with:
# cd /usr
# cvs -q -z2 -d anoncvs@anoncvs.netbsd.org:/cvsroot checkout -P pkgsrc
# cd pkgsrc/bootstrap
# ./bootstrap
This may take some time. Set some recommended options in
~/.cvsrc:
cvs -q -z2
checkout -P
update -dP
diff -upN
rdiff -u
release -d
Build options for make can be added to
/etc/mk.conf:
MKX11=no
CLEANDEPENDS=yes
MASTER_SORT=.de .fr .uk
PYTHON_VERSION_DEFAULT=36
You need to extend your $PATH variable:
# setenv PATH /usr/pkg/bin:/usr/pkg/sbin:$PATH
Packages can be compiled with make:
# cd /usr/pkgsrc/lang/python36
# make install clean clean-depends
You can update pkgsrc with:
# cd /usr/pkgsrc
# cvs update -dP
GPIO
A kernel module is provided to access the GPIO interface of the Raspberry Pi.
At first, edit /etc/rc.conf and add:
gpio=YES
The GPIO pins you want to use must be defined in /etc/gpio.conf.
For example, you can set pin 17 for input:
gpio0 17 set in pin_17
You can change pin_17 to something else, it is just a label for
the pin. Use gpioctl to poll the state of the pin:
# gpioctl gpio0 pin_17
USB Flash Drive
USB flash memory and other external drives use the device node
/dev/sdXe. For instance, you can mount it with:
# mount -t msdos /dev/sd0e /mnt
