Installation of OpenADMS Node
The following dependencies have to be installed at first in order to run OpenADMS Node:
CPython 3.6+ or PyPy3.5+,
the Python packaging tool pipenv,
optional: an MQTT message broker,
optional: the Git version control system.
Quick Start
You can run OpenADMS Node by following these steps:
Download and install Python 3.6 or higher.
Download and unpack OpenADMS Node. For the most recent version, clone the master branch of the GitHub repository.
Install
pipenvwithpip3 install --user pipenv.Inside the OpenADMS Node directory, run
pipenv lockand thenpipenv sync.Write a configuration file for OpenADMS Node (see directory
config/examples/for examples).Run
pipenv run ./openadms.py --config config/config.json --with-mqtt-broker
--debug
in the command-line or start the graphical launcher withlauncher.bat(Microsoft Windows) orlauncher.sh(Unix-like).
Source Code
The release versions of OpenADMS Node are hosted on GitHub. If you like to download the latest version, you can clone the master branch of the GitHub repository using the Git version control system:
$ git clone https://github.com/dabamos/openadms-node.git
The master branch is available as a Zip archive for those who do not want to use Git.
Python
OpenADMS Node is written in Python. A recent Python 3 interpreter is required to run the software. CPython 3.6 (or higher) and PyPy3.5 (or higher) are supported. Interpreters are available for all modern operating systems.
- Microsoft Windows Vista/7/8/10
Download the latest release from the Python website and execute the installer. Please refer to the official installation notes of the Python documentation. It is strongly recommended to add Python to the
PATHvariable of the system (see Fig. 2).- Linux and Unix
Install Python 3.6 or higher by using your favourite package managing system or compile it from source.
- macOS
The latest version of Python is also available for download on the Python website.
- Android
Install QPython3 from the Google Play Store.
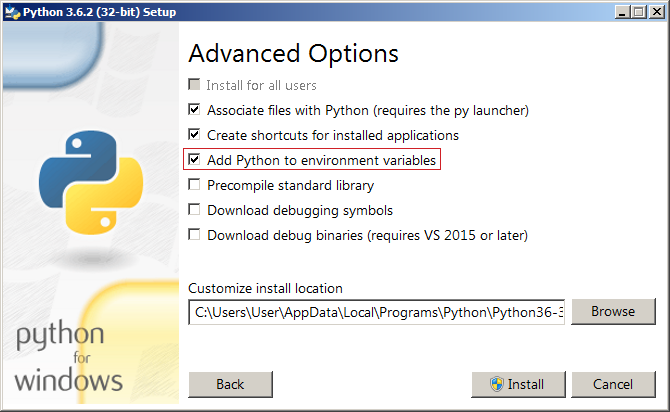
Fig. 2 Add Python to the PATH variable of Microsoft Windows
Packages
The dependencies can be installed with the Python package manager pipenv. If not installed already, run:
$ pip3 install --user pipenv
Create a virtual environment with all required Python packages by running
pipenv inside the directory openadms-node/:
$ pipenv lock
$ pipenv sync
Development packages can be installed additionally with:
$ pipenv sync --dev
On Microsoft Windows, the batch file install.bat can be executed to install
all dependencies.
Android
Copy the OpenADMS Node directory to qpython3/scripts3/ on you Android
device. Start the QPython3 app and select QPYPI. Open the Pip console and enter:
-->pip3 install -r scripts3/openadms-node/requirements.txt
This will install all dependencies. The uptime package may not be available
on QPYPI. You can ignore any warnings.
Message Broker
The MQTT protocol is used for the internal and external message exchange in OpenADMS Node. Therefore, it is necessary to install and run an MQTT message broker before starting the monitoring system. Many implementations of message brokers are available (list of servers), some of them are open-source, for example:
RabbitMQ (MQTT via plug-in).
HBMQTT is installed as a dependency automatically. The broker will be started by
OpenADMS Node if the command-line argument --with-mqtt-broker is added. If
the internal HBMQTT is used, a 3rd party message broker is not required. The
HBMQTT server can be started manually from command line with:
$ pipenv run hbmqtt
Note
For testing only, the public sandbox broker of Eclipse IoT can be used.
The server supports MQTT and WebSockets, both plain and TLS secured. Access
the server using the hostname iot.eclipse.org and port 1883. For
encryption, use port 8883. MQTT over WebSockets runs on the ports 80
and 443.
System Service
Microsoft Windows
Note
This section is still under construction.
Linux
In case you are running a Linux distribution with the systemd init system, you
can use the provided unit file to start OpenADMS as a daemon. Copy and rename
the file services/openadms.systemd to
/etc/systemd/system/openadms.service. OpenADMS must be installed in
/usr/local/sbin/openadms/. The configuration will be loaded from
/usr/local/etc/openadms/config.json. You can alter these values in the
service file.
Be aware that no MQTT message broker will be started by this service. You may
want to use an external broker, like Eclipse Mosquitto, or append the parameter
-m to ExecStart in the service file to enable the internal broker.
The OpenADMS unit has to be loaded with:
$ systemctl daemon-reload
Enable the unit to run OpenADMS as a service:
$ systemctl enable openadms
Start the OpenADMS unit manually:
$ systemctl start openadms
Stop the OpenADMS unit manually:
$ systemctl stop openadms
Show the status of the OpenADMS unit, including whether it is running or not:
$ systemctl status openadms
For more information regarding systemd, see the Arch Linux Wiki.
FreeBSD
The rc.d script services/openadms.freebsd) is provided for FreeBSD to start
OpenADMS Node automatically at boot time. The script has to be copied and
renamed to /usr/local/etc/rc.d/openadms. OpenADMS starts with the privileges
of user openadms. You can add the user with:
$ useradd -m -G dialer openadms
$ passwd openadms
Then, add the following line to your /etc/rc.conf:
openadms_enable="YES"
You can alter the default configuration of the daemon by adding the following
lines to /etc/rc.conf:
openadms_user="openadms" ➊
openadms_config="/usr/local/etc/openadms/openadms.json" ➋
openadms_path="/usr/local/sbin/openadms/openadms.py" ➌
openadms_log="/var/log/openadms.log" ➍
openadms_args="" ➎
User to run OpenADMS Node as.
File path of the configuration.
File path of the Python script.
File path of the log file.
Additional command-line arguments.
OpenADMS Node can be started manually with:
$ service openadms onestart
To stop it, run:
$ service openadms onestop
Please note, that an MQTT message broker, like Mosquitto, has to be started
first. Add the following line to your /etc/rc.conf to start Mosquitto
automatically:
mosquitto_enable="YES"
The daemon can be started manually with:
$ service mosquitto onestart
Instead of using an external MQTT message broker, you can also enable
the internal broker by adding the appropriate command-line argument to
openadms_args in /etc/rc.conf:
openadms_args="--with-mqtt-broker"
NetBSD
For NetBSD, the rc.d script services/openadms.netbsd can be used to start
OpenADMS Node as a service. The script has to be copied and renamed to
/etc/rc.d/openadms. OpenADMS must be installed to /usr/sbin/openadms/.
The configuration is expected to be in /usr/etc/openadms/openadms.json and
the log file will be located at /var/log/openadms.log. OpenADMS starts with
the privileges of user openadms. You can add the user with:
$ useradd -m -G dialer openadms
$ passwd openadms
Enable OpenADMS in /etc/rc.conf:
openadms=YES
Add the following lines to /etc/rc.conf to alter the default configuration:
openadms_user="openadms" ➊
openadms_path="/usr/sbin/openadms/" ➋
openadms_config="/usr/etc/openadms/openadms.json" ➌
openadms_log="/var/log/openadms.log" ➍
User to run OpenADMS Node as.
File path of the configuration file.
Path of the OpenADMS Node directory.
File path of the log file.
Start OpenADMS manually with:
$ service openadms onestart
To stop it, run:
$ service openadms onestop
Stand-Alone Executables for Microsoft Windows
OpenADMS can be compiled to a stand-alone executable (.exe file) that does
not depend on a globally installed Python interpreter by using either
PyInstaller, cx_Freeze, or Nuitka.
PyInstaller
PyInstaller is capable of creating executables for many operating systems,
including Microsoft Windows. In order to use PyInstaller, Microsoft Visual C++
2010 Redistributable Package and the Python module itself have to be installed
at first. PyInstaller can be obtained with pip:
> pipenv install --dev PyInstaller
Build OpenADMS Node by running:
> pipenv run pyinstaller --clean --noconfirm --icon="extra\dabamos.ico" --hidden-import "modules.database" --hidden-import "modules.export" --hidden-import "modules.notification" --hidden-import "modules.port" --hidden-import "modules.processing" --hidden-import "modules.prototype" --hidden-import "modules.schedule" --hidden-import "modules.server" --hidden-import "modules.testing" --hidden-import "modules.totalstation" --hidden-import "modules.virtual" openadms.py
Build the graphical launcher with:
> pipenv run pyinstaller --clean --windowed --noconfirm --icon="extra\dabamos.ico" --hidden-import "gooey" --hidden-import "openadms" --hidden-import "modules.database" --hidden-import "modules.export" --hidden-import "modules.notification" --hidden-import "modules.port" --hidden-import "modules.processing" --hidden-import "modules.prototype" --hidden-import "modules.schedule" --hidden-import "modules.server" --hidden-import "modules.testing" --hidden-import "modules.totalstation" --hidden-import "modules.virtual" openadms-launcher.pyw
The binaries will be located in the sub-folder dist. Copy the folders
data, config, core, modules, schemes, and sensors into
dist. Furthermore, copy folder C:\Python36\Lib\site-packages\gooey to
dist\openadms-launcher\. Execute openadms-launcher.exe to
start the OpenADMS graphical launcher.
cx_Freeze
Like PyInstaller, cx_Freeze is cross platform library to create executables of
Python scripts. Install it with pip at first:
> pipenv install --dev cx_Freeze appdirs packaging
Create a file setup.py with the following contents:
#!/usr/bin/env python3.6

"""Setup for cx_Freeze

This script creates executables for Microsoft Windows by using cx_Freeze.
Just run::

    $ python setup.py build

All files will be stored under ``dist/``."""

import sys

from cx_Freeze import setup, Executable

from core.version import *


build_exe_options = {
    'build_exe': 'dist',
    'packages': ['asyncio',
                 'appdirs',
                 'packaging',
                 'modules.database',
                 'modules.export',
                 'modules.notification',
                 'modules.port',
                 'modules.processing',
                 'modules.prototype',
                 'modules.schedule',
                 'modules.server',
                 'modules.testing',
                 'modules.totalstation',
                 'modules.virtual'],
    'excludes': ['tkinter'],
    'include_files': [
        'config',
        'data',
        'extra',
        'modules',
        'schemes',
        'sensors'
    ],
    'silent': True
}

base = None

if sys.platform == 'win32':
    base = 'Win32GUI'

executables = [
    Executable('openadms.py', base=base),
    Executable('openadms-launcher.pyw', base=base)
]

setup(name='OpenADMS Node',
      version=str(OPENADMS_VERSION),
      description='OpenADMS Node',
      options={
          'build_exe': build_exe_options
      },
      executables=executables)
Build OpenADMS Node by running:
> pipenv run ./setup.py build
You can then start the graphical launcher openadms-launcher.exe in
directory dist/.
Nuitka
Nuitka is a Python compiler that translates Python code into a C program that
is linked against libpython to execute it in the same way as CPython does.
Before OpenADMS Node can be compiled, install:
Python 3.6 or higher,
Python 2.7 (for SCons),
Microsoft Visual Studio 2017 (and pywin32) or MinGW-w64,
Nuitka for Python 3.6.
If you prefer MinGW over Visual Studio, install it to C:\MinGW64 and set the
Windows environment variable CC to C:\MinGW64\mingw64\bin\gcc.exe.
Build OpenADMS Node with:
> nuitka3 --standalone --python-version=3.6 --recurse-all --recurse-plugins=core --recurse-plugins=modules --recurse-not-to=modules.tests --recurse-not-to=modules.rpi --recurse-not-to=modules.unix --show-progress --windows-icon=extra/dabamos.ico openadms.py
> nuitka3 --standalone --python-version=3.6 --recurse-all --recurse-plugins=core --recurse-plugins=modules --recurse-not-to=modules.tests --recurse-not-to=modules.rpi --recurse-not-to=modules.unix --show-progress --windows-disable-console --windows-icon=extra/dabamos.ico openadms-launcher.pyw
The compilation may take some time.