OpenADMS Node Modules
The logic of the OpenADMS Node application is outsourced to several modules in
the directory modules/. New features can be added to the monitoring system
by writing additional modules. Each module must be loaded before it can be used.
Database |
||
Database connectivity for Apache CouchDB. |
0.6 |
|
Export |
||
Exports observations to an OpenADMS Server instance. |
0.8 |
|
Exports observations to flat files in CSV format. |
0.3 |
|
Distributes observations in real time over MQTT. |
0.3 |
|
Notification |
||
Collects alert messages. |
0.3 |
|
Formats alert messages (e-mail, SMS, IRC, etc.). |
0.3 |
|
Sends messages to an OpenADMS Server instance. |
0.8 |
|
Sends heartbeats to an OpenADMS Server instance. |
0.8 |
|
Sends messages to an Internet Relay Chat network. |
0.6 |
|
Sends e-mails via SMTP. |
0.3 |
|
Sends “toots” to the Mastodon social network. |
0.6 |
|
Exports alert messages as RSS feed. |
0.6 |
|
Sends short messages to an TCP/IP-based SMS gateway. |
0.3 |
|
Port |
||
Experimental communication with Bluetooth. |
0.5 |
|
Serial port communication (RS-232/RS-422/RS-485). |
0.3 |
|
Processing |
||
Extracts values from raw observation responses. |
0.3 |
|
Validates observation responses. |
0.6 |
|
Checks the return codes of Leica Geosystems sensors. |
0.3 |
|
Converts units of observation response values. |
0.5 |
|
Prototype |
||
Blueprint for new OpenADMS module. |
0.3 |
|
Raspberry Pi |
||
Counts interrupts on a GPIO pin of the Raspberry Pi. |
0.5 |
|
Schedule |
||
General scheduling of observations. |
0.3 |
|
Server |
||
Webserver for simple remote control. |
0.5 |
|
Testing |
||
Creates warning, error, and critical log messages. |
0.6 |
|
Totalstation |
||
Removes atmospheric influences from distances. |
0.3 |
|
Free stationing of total stations. |
0.3 |
|
Converts polar coordinates to Cartesian coordinates. |
0.3 |
|
Corrects the atmospheric refraction. |
0.4 |
|
Processing of observations in two faces. |
0.3 |
|
Unix |
||
Interacts with the GPIO interface of the Raspberry Pi. |
0.6 |
|
Virtual |
||
Virtual STS DTM temperature/pressure sensor. |
0.3 |
|
Virtual Sylvac S_Dial One digital indicator. |
0.3 |
|
Virtual Leica TM30 total station. |
0.3 |
Modules can be loaded by adding them to the modules section of the OpenADMS
Node core configuration. In the example below, the modules Scheduler and
FileExporter will be loaded:
{
  "core":
    "modules": {
      "fileExporter": "modules.export.FileExporter",
      "schedulerCom1": "modules.schedule.Scheduler"
    }
  },
  "modules": {}
}
The key fileExporter sets the name of the instance, the value
modules.export.FileExporter the path to the module (class FileExporter
in file modules/export.py). The configuration of each loaded module must be
added to the modules section of the file.
The name of an instance can be chosen freely. For instance, instead of
fileExporter the name myFileExporter is valid too, but the key of the
FileExporter configuration in the modules section has to be renamed as well.
Multiple instances of a module are possible, if they have distinct names (e.g.,
scheduler1, scheduler2, and so on). Each instance has its own
configuration.
Database
Drivers for various database management systems are provided in this package.
CouchDriver
CouchDriver is a connectivity module for Apache CouchDB 1/2 (see Fig. 5). It is used to store observation data sets (timeseries) in a CouchDB database defined in the module’s configuration. Observations are cached before inserting them into the database. On connection error, the transmission will be repeated until the server has stored them successfully. If a file-based cache database is used, observation are persistent between restarts of OpenADMS Node.

Fig. 5 An observation data set stored in an Apache CouchDB database
Loading the Module
Add the following line to the modules section of the configuration file to
load the CouchDriver:
{
  "modules": {
    "couchDriver": "modules.database.CouchDriver"
  }
}
Configuration
An example CouchDB server on
https://alice:secret@db.example.com:443/couchdb/ may has the following
configuration.
{
  "couchDriver": {
    "server": "db.example.com",
    "path": "couchdb/",
    "port": 5984,
    "tls": true,
    "user": "alice",
    "password": "secret",
    "db": "openadms",
    "cacheFile": "cache.json"
  }
}
Name |
Data Type |
Description |
|---|---|---|
|
String |
IP address or FQDN of the CouchDB server. |
|
String |
URI path (if available). |
|
String |
Port number (CouchDB default is |
|
Boolean |
If true, uses encrypted HTTPS instead of HTTP (depends on server). |
|
String |
Name of the CouchDB user. |
|
String |
Password of the CouchDB user. |
|
String |
Name of the CouchDB database. |
|
String |
File name of the local cache database. If not set, an in-memory database is used instead. |
Export
Modules in the Export package store observation data locally or forward it to external receivers.
CloudExporter
The CloudExporter module sends observations to local or remote OpenADMS Server
instances. Make sure to add the name of the CloudExporter module to the
receivers list of the observations that should be transmitted to the
server.
Loading the Module
Add the CloudExporter to the modules section of the core configuration:
{
  "modules": {
    "cloudExporter": "modules.export.CloudExporter"
  }
}
Configuration
{
  "cloudExporter": {
    "host": "https://api.example.com/",
    "user": "<username>",
    "password": "<password>",
    "cache": "file",
    "db": "cache.json"
  }
}
Name |
Data Type |
Description |
|---|---|---|
|
String |
OpenADMS Server URL or IP address. |
|
String |
OpenADMS Sever user name. |
|
String |
OpenADMS Sever password. |
|
String |
Cache type (either |
|
String |
File name of the cache database (if |
FileExporter
The FileExporter module is used to export observations as comma-separated values
to flat files. Each file starts with a header, introduced by the character
#. Observations are stored line by line in the file, with new lines
appended to the end.
Each line starts with date and time of the observation, followed by ID, target
name and all response sets in alphabetical order. The format of date and time
can be modified in the configuration. A response set consists of response name,
response value, and response unit (for example: distance, 27.412,
m).
Example
A single observation in a CSV file, with a header line at the beginning:
# Target "EXT" of "Extensometer" on "USB0"
2016-10-09T15:29:38,6dc84c06018043ba84ac90636ed0f677,EXT,distance,19.212,mm
No. |
Value |
Description |
|---|---|---|
1 |
|
Date and time (ISO 8601). |
2 |
|
ID of the observation. |
2 |
|
Target name of the observation. |
3 |
|
Name of the response set. |
4 |
|
Value of the response set. |
5 |
|
Unit of the response set. |
Loading the Module
Add the FileExporter to the modules section of the core configuration:
{
  "modules": {
    "fileExporter": "modules.export.FileExporter"
  }
}
Configuration
{
  "fileExporter": {
    "fileExtension": ".csv",
    "fileName": "{{port}}_{{target}}_{{date}}",
    "fileRotation": "monthly",
    "paths": [
      "./data",
      "/media/usbstick/backup"
    ],
    "separator": ",",
    "dateTimeFormat": "YYYY-MM-DDTHH:mm:ss.SSSSS",
    "saveObservationId": true
  }
}
Name |
Data Type |
Description |
|---|---|---|
|
String |
Extension of the CSV file. |
|
String |
File name with possible placeholders
|
|
String |
File rotation ( |
|
Array |
Paths to save files to (multiple paths possible). |
|
String |
Separator between values within the CSV file. |
|
String |
Format of date and time (see Arrow tokens). |
|
Boolean |
If |
RealTimePublisher
The RealTimePublisher module pushes an observation to a list of MQTT topics. The receivers can be any third party application connected to the MQTT server.
Observation are published under their target name. For example, observations
with target “bridge1” and a topic “onlineViewer” will be published to the MQTT
topic onlineViewer/bridge1.
Loading the Module
Add the RealTimePublisher to the modules section of the core configuration:
{
  "modules": {
    "realTimePublisher": "modules.export.RealTimePublisher"
  }
}
Configuration
{
  "realTimePublisher": {
    "enabled": true,
    "topics": [
      "onlineViewer"
    ]
  }
}
Notification
Alerter
The Alerter module captures warning and error messages. The messages are drained off from the OpenADMS logger and then send to an arbitrary number of AlertMessageFormatter modules. These will format the messages and forward them to MailAgent, ShortMessageAgent, RssAgent, IrcAgent, or MastodonAgent modules, where they are send to their defined receivers.
The sequences could be:
Alerter → CloudAgent
Alerter → AlertMessageFormatter → MailAgent
Alerter → AlertMessageFormatter → ShortMessageAgent
Alerter → AlertMessageFormatter → RssAgent
Alerter → AlertMessageFormatter → IrcAgent
Alerter → AlertMessageFormatter → MastodonAgent
Loading the Module
Add the Alerter to the modules section of the core configuration:
{
  "modules": {
    "alerter": "modules.notification.Alerter"
  }
}
Alert Message Format
The Alerter module forwards the message in a particular JSON-based format with
the type alert. Example:
[
  {
    "type": "alert"
  },
  {
    "dt": "2017-09-12 21:40:57",
    "level": "error",
    "module": "serialPort",
    "message": "Observation 'getP09' of 'P09': No target detected",
    "receiver": "engineer@example.com"
  }
]
Name |
Data Type |
Description |
|---|---|---|
|
Integer |
Time stamp of the alert message. |
|
String |
Alert level ( |
|
String |
Name of the module which sent the message. |
|
String |
Message text. |
|
String |
Receiver of the message (e.g., e-mail address, phone number, IRC channel). |
Configuration
{
  "alerter": {
    "enabled": true,
    "modules": {
      "cloudAgent": {
        "enabled": true,
        "receivers": {
          "critical": [ "default" ],
          "error": [ "default" ],
          "warning": [ "default" ]
        }
      },
      "shortMessageFormatter": {
        "enabled": true,
        "receivers": {
          "error": [ "+49152 12345678" ],
          "critical": [ "+49178 110010101" ]
        }
      },
      "mailFormatter": {
        "enabled": true,
        "receivers": {
          "warning": [ "warnings@example.com" ],
          "error": [ "engineer@example.com", "customer@example.com" ]
        }
      }
    }
  }
}
Name |
Data Type |
Description |
|---|---|---|
|
Object |
Modules to process alert messages. |
|
Boolean |
Turns forwarding to module on/off. |
|
Object |
Alert levels and their respective receivers (depend on module). |
AlertMessageFormatter
The AlertMessageFormatter is used to format alert messages before sending them to the MailAgent, the ShortMessageAgent, the RssAgent, or the IrcAgent. The style of an e-mail or SMS can be defined by writing simple templates. Furthermore, the module is capable of caching incoming messages a certain time, forwarding them as a whole.
Cached alerts will be concatenated in the body of the message, with the same header and footer. An example e-mail message is:
The following incident(s) occurred:

2017-03-20T02:53:51 - warning - Observation "getP03" of target "P03": Only angle measurement valid, but without full correction (code 1288 in response "rcGetValues1")
2017-03-20T02:57:55 - error - Observation "getP11" of target "P11": No target detected (code 8710 in response "rcChangeFace")

Please do not reply as this e-mail was sent from an automated alerting system.
Loading the Module
Add the AlertMessageFormatter to the modules section of the core configuration:
{
  "modules": {
    "alertMessageFormatter": "modules.notification.AlertMessageFormatter"
  }
}
Configuration
Given are two AlertMessageFormatter, mailFormatter and
shortMessageFormatter:
{
  "modules": {
    "mailFormatter": "modules.notify.AlertMessageFormatter",
    "shortMessageFormatter": "modules.notify.AlertMessageFormatter"
  }
}
They are used to format e-mails and short messages.
{
  "mailFormatter": {
    "messageCollectionEnabled": true,
    "messageCollectionTime": 600,
    "receiver": "mailAgent",
    "type": "email",
    "templates": {
      "header": "The following incident(s) occurred:\n\n",
      "body": "{{dt}} - {{level}} - {{message}}\n",
      "footer": "\nPlease do not reply as this e-mail was sent from an automated alerting system."
    },
    "properties": {
      "subject": "[OpenADMS] Alert Message - Project X",
      "from": "OpenADMS",
      "to": "{{receiver}}"
    }
  },
  "shortMessageFormatter": {
    "messageCollectionEnabled": false,
    "messageCollectionTime": 0,
    "receiver": "shortMessageAgent",
    "type": "sms",
    "templates": {
      "header": "<?xml version=\"1.0\"?><cmgs destaddr=\"{{receiver}}\">",
      "body": "{{dt}} - {{level}} - {{message}}",
      "footer": "</cmgs>"
    },
    "properties": {
      "number": "{{receiver}}"
    }
  }
}
Name |
Data Type |
Description |
|---|---|---|
|
Boolean |
Collect messages in a cache before sending. |
|
Float |
Time in seconds to cache messages. |
|
String |
Name of the receiving module. |
|
String |
Type of the message (e.g., |
|
Object |
Message templates with |
|
Object |
Additional properties expected by the receiver. |
The templates header, body, and footer are parsed for placeholders:
Name |
Description |
|---|---|
|
Date and time of the log entry. |
|
Log level ( |
|
Log message text. |
|
ID of the sensor node. |
|
Name of the sensor node. |
|
ID of the project. |
|
Name of the project. |
CloudAgent
The CloudAgent module sends log messages to local or remote OpenADMS Server instances.
Loading the Module
Add the CloudAgent to the modules section of the core configuration:
{
  "modules": {
    "cloudAgent": "modules.notification.CloudAgent"
  }
}
Configuration
Add the connection details of the OpenADMS Server you want to access to the configuration:
{
  "cloudAgent": {
    "host": "https://api.example.com/",
    "user": "<username>",
    "password": "<password>"
  }
}
Name |
Data Type |
Description |
|---|---|---|
|
String |
OpenADMS Server URL or IP address. |
|
String |
OpenADMS Server user name. |
|
String |
OpenADMS Server password. |
Connect the Alerter module with the CloudAgent:
{
  "alerter": {
    "enabled": true,
    "modules": {
      "cloudAgent": {
        "enabled": true,
        "receivers": {
          "warning": ["default"],
          "error": ["default"],
          "critical": ["default"]
        }
      }
    }
  },
  "cloudAgent": {
    "host": "https://api.example.com/",
    "user": "<username>",
    "password": "<password>"
  }
}
It is necessary to add dummy receivers (e. g., default) to the Alerter
module.
Heartbeat
The Heartbeat sends signals periodically in a defined interval to a list of receivers. The module is used to inform the receivers that the OpenADMS Node instance is still alive (see Wikipedia).
Loading the Module
Add the Heartbeat to the modules section of the core configuration:
{
  "modules": {
    "heartbeat": "modules.notification.Heartbeat"
  }
}
Configuration
{
  "heartbeat": {
    "host": "https://api.example.com/",
    "user": "<username>",
    "password" : "<password>",
    "frequency": 300
  }
}
Name |
Data Type |
Description |
|---|---|---|
|
String |
OpenADMS Server URL or IP address. |
|
String |
OpenADMS Server user name. |
|
String |
OpenADMS Server password. |
|
Integer |
Heartbeat frequency in seconds. |
IrcAgent
The IrcAgent connects to an Internet Relay Chat (IRC) server and sends messages
to a given channel or user. The module accepts messages of type irc.
Loading the Module
Add the IrcAgent to the modules section of the core configuration:
{
  "modules": {
    "ircAgent": "modules.notification.IrcAgent"
  }
}
IRC Message Format
The messages send to the module have to be structured in JSON format:
[
  {
    "type": "irc"
  },
  {
    "message": "2017-09-08T11:55:58 - error - preProcessor - No response in observation 'getDistance' of target 'disto'",
    "target": "#mychannel"
  }
]
Name |
Data Type |
Description |
|---|---|---|
|
String |
Message text. |
|
String |
IRC channel or user to send the message to. |
Configuration
{
  "ircAgent": {
    "server": "irc.freenode.net",
    "port": 6697,
    "tls": true,
    "nickname": "iot_bot",
    "password": "",
    "target": "#flood",
    "channel": "#flood"
  }
}
Name |
Data Type |
Description |
|---|---|---|
|
String |
IRC server (IP address or FQDN). |
|
String |
Port number (e.g., |
|
Boolean |
If |
|
String |
Nickname to register with. |
|
String |
Password of the nickname (optional). |
|
String |
Default target to send messages to (channel or user). |
|
String |
Channel to join at start-up (optional). |
Example
An Alerter instance and an AlertMessageFormatter instance can be used to send log messages to an IRC server:
{
  "modules": {
    "alerter": "modules.notification.Alerter",
    "ircFormatter": "modules.notification.AlertMessageFormatter",
    "ircAgent": "modules.notification.IrcAgent"
  },
  "alerter": {
    "enabled": true,
    "modules": {
      "ircFormatter": {
        "enabled": true,
        "receivers": {
          "warning": [ "#mychannel" ],
          "error": [ "#mychannel" ],
          "critical": [ "#mychannel" ]
        }
      }
    }
  },
  "ircFormatter": {
    "messageCollectionEnabled": false,
    "messageCollectionTime": 0,
    "type": "irc",
    "receiver": "ircAgent",
    "templates": {
      "body": "{{dt}} - {{level}} - {{name}} - {{message}}"
    },
    "properties": {
      "target": "{{receiver}}"
    }
  },
  "ircAgent": {
    "server": "irc.freenode.net",
    "port": 6697,
    "tls": true,
    "nickname": "openadms___",
    "target": "#mychannel",
    "channel": "#mychannel"
  }
}
The setup can be tested with the ErrorGenerator module.
MailAgent
The MailAgent is used to send arbitrary messages as e-mails via an SMTP server. The module expects the messages to be in a particular format, which is described below.
Loading the Module
Add the MailAgent to the modules section of the core configuration:
{
  "modules": {
    "mailAgent": "modules.notification.MailAgent"
  }
}
E-Mail Message Format
The messages have to be structured in JSON format:
[
  {
    "type": "email"
  },
  {
    "subject": "E-mail subject",
    "from": "OpenADMS",
    "to": "recipient@example.com",
    "message": "Hello, world!"
  }
]
Name |
Data Type |
Description |
|---|---|---|
|
String |
Subject of the e-mail. |
|
String |
Sender of the e-mail. |
|
String |
Receiver of the e-mail. |
|
String |
E-mail text. |
Configuration
{
  "mailAgent": {
    "defaultSubject": "[OpenADMS] Message",
    "charset": "utf-8",
    "userMail": "monitoring@example.com",
    "userName": "monitoring",
    "userPassword": "secret",
    "host": "smtp.example.com",
    "port": 465,
    "tls": true,
    "startTls": false
  }
}
Name |
Data Type |
Description |
|---|---|---|
|
Boolean |
Default subject of the e-mail. |
|
String |
Charset of the e-mail. |
|
String |
E-mail address of the sender. |
|
String |
SMTP login name. |
|
String |
SMTP login password. |
|
String |
SMTP host (IP address or FQDN). |
|
Integer |
SMTP port. |
|
Boolean |
If |
|
Boolean |
If |
MastodonAgent
The MastodonAgent sends “toots” to the Twitter-like social network Mastodon (see Fig. 6). You need an account on one of the Mastodon instances. See joinmastodon.org for a list of servers. The length of messages send to the Mastodon network is limited to 500 characters.
Loading the Module
Add the MastodonAgent to the modules section of the core configuration:
{
  "modules": {
    "mastodonAgent": "modules.notification.MastodonAgent"
  }
}
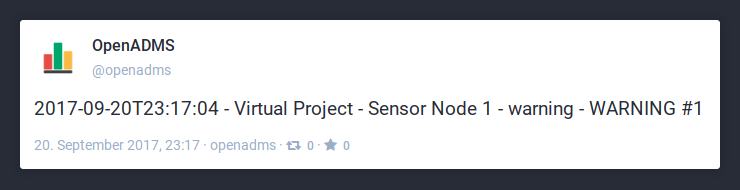
Fig. 6 OpenADMS alert message on Mastodon
Mastodon Message Format
The messages have to be structured in JSON format:
[
  {
    "type": "mastodon"
  },
  {
    "message": "Hello, world!"
  }
]
Name |
Data Type |
Description |
|---|---|---|
|
String |
The text of the “toot” (< 500 characters). |
Configuration
{
  "mastodonAgent": {
    "email": "mail@example.com",
    "password": "secret",
    "url": "https://mastodon.at"
  }
}
Name |
Data Type |
Description |
|---|---|---|
|
String |
E-mail address associated with the Mastodon account. |
|
String |
Password of the Mastodon account. |
|
String |
URL of the Mastodon instance. |
Example
An Alerter instance and an AlertMessageFormatter instance can be used to send log messages to the MastodonAgent:
{
  "modules": {
    "alerter": "modules.notification.Alerter",
    "mastodonFormatter": "modules.notification.AlertMessageFormatter",
    "mastodonAgent": "modules.notification.MastodonAgent"
  },
  "alerter": {
    "enabled": true,
    "modules": {
      "mastodonFormatter": {
        "enabled": true,
        "receivers": {
          "warning": [ "mastodonAgent" ],
          "error": [ "mastodonAgent" ],
          "critical": [ "mastodonAgent" ]
        }
      }
    }
  },
  "mastodonFormatter": {
    "messageCollectionEnabled": false,
    "messageCollectionTime": 0,
    "type": "mastodon",
    "receiver": "mastodonAgent",
    "templates": {
      "body": "{{dt}} - {{project}} - {{node}} - {{name}} - {{level}} - {{message}}"
    },
    "properties": {}
  },
  "mastodonAgent": {
    "email": "mail@example.com",
    "password": "secret",
    "url": "https://mastodon.at"
  }
}
The setup can be tested with the ErrorGenerator module.
RssAgent
The RssAgent exports messages as an RSS 2.0 feed. Users can subscribe a public
feed to access log messages with a feed reader (see Fig. 7).
The RSS format is based on XML. The module accepts messages of type rss.
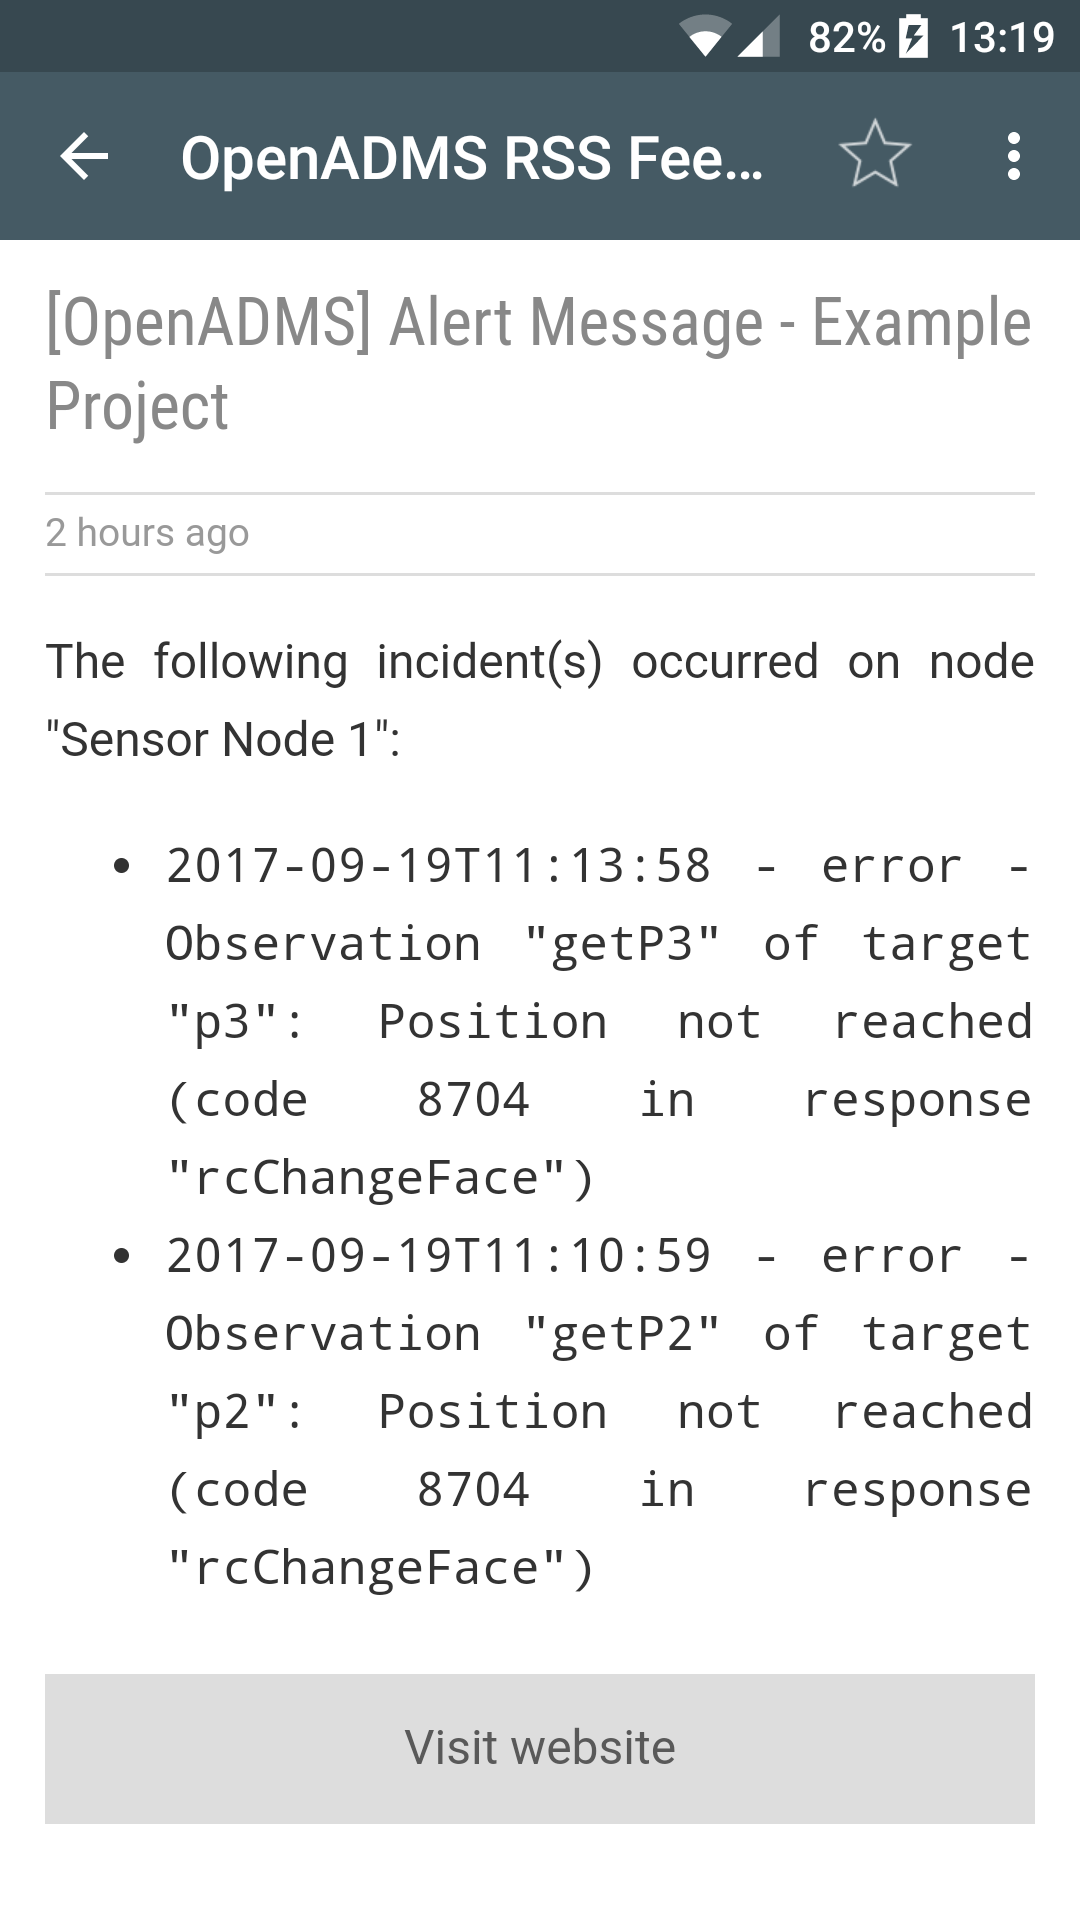
Fig. 7 RSS feed with alert messages on Android
Loading the Module
Add the RssAgent to the modules section of the core configuration:
{
  "modules": {
    "rssAgent": "modules.notification.RssAgent"
  }
}
RSS Message Format
The messages send to the module have to be structured in JSON format:
[
  {
    "type": "rss"
  },
  {
    "author": "mail@example.com (John Doe)",
    "dt": "2017-09-18T19:55:45.955084+00:00",
    "guid": "urn:uuid:4d8fc364-f3fc-46d5-869b-7a7c1b9c8972",
    "message": "2017-09-18T19:55:42 - error - preProcessor - No response in observation 'getDistance' of target 'disto'",
    "title": "[OpenADMS] Alert Message - Example Project"
  }
]
Name |
Data Type |
Description |
|---|---|---|
|
String |
Author of the RSS entry (optional). |
|
String |
Date and time of the RSS entry in UTC (optional). |
|
String |
Globally Unique Identifier (GUID) of the RSS entry (optional). |
|
String |
Message of the RSS entry. |
|
String |
Title of the RSS entry (optional). |
Configuration
{
  "rssAgent": {
    "author": "mail@example.com (John Doe)",
    "description": "OpenADMS RSS 2.0 Feed - Example Project",
    "filePath": "./feed.rss",
    "language": "en",
    "link": "https://www.example.com/feed.rss",
    "size": 25,
    "title": "OpenADMS Monitoring - Example Project"
  }
}
Name |
Data Type |
Description |
|---|---|---|
|
String |
E-mail and name of the author (optional). |
|
String |
Description text of the RSS feed. |
|
String |
Path of the RSS file. |
|
String |
ISO 639-1 language code (optional). |
|
String |
URL of the RSS feed. |
|
Integer |
Number of entries in the RSS feed. |
|
String |
Title of the RSS feed. |
Example
An Alerter instance and an AlertMessageFormatter instance can be used to send log messages to the RssAgent:
{
  "modules": {
    "alerter": "modules.notification.Alerter",
    "rssFormatter": "modules.notification.AlertMessageFormatter",
    "rssAgent": "modules.notification.RssAgent"
  },
  "alerter": {
    "enabled": true,
    "modules": {
      "rssFormatter": {
        "enabled": true,
        "receivers": {
          "warning": [ "rssAgent" ],
          "error": [ "rssAgent" ],
          "critical": [ "rssAgent" ]
        }
      }
    }
  },
  "rssFormatter": {
    "messageCollectionEnabled": true,
    "messageCollectionTime": 600,
    "type": "rss",
    "receiver": "rssAgent",
    "templates": {
      "header": "<![CDATA[<p>The following incident(s) occurred on node \"{{node}}\":</p>\n<ul>\n",
      "body": "<li><code>{{dt}} - {{level}} - {{message}}</code></li>\n",
      "footer": "</ul>]]>"
    },
    "properties": {
      "title": "[OpenADMS] Alert Message - Example Project",
      "author": "mail@example.com (OpenADMS)",
      "link": "http://www.example.com/feed.rss"
    }
  },
  "rssAgent": {
    "author": "mail@example.com (John Doe)",
    "description": "OpenADMS RSS 2.0 Feed - Example Project",
    "filePath": "./feed.rss",
    "language": "en",
    "link": "https://www.example.com/feed.rss",
    "size": 25,
    "title": "OpenADMS Monitoring - Example Project"
  }
}
The setup can be tested with the ErrorGenerator module.
ShortMessageAgent
The ShortMessageAgent can be used to establish a socket connection to a 2G/3G/LTE modem/router and sending an XML-based alerting message to it. The message will then be forwarded by Short Message Service (SMS). The module is designed for industrial routers of MC Technologies, but should also work with other socket-based SMS servers.
Loading the Module
Add the ShortMessageAgent to the modules section of the core configuration:
{
  "modules": {
    "shortMessageAgent": "modules.notification.ShortMessageAgent"
  }
}
SMS Message Format
The messages have to be structured in JSON format:
[
  {
    "type": "sms"
  },
  {
    "number": "+49176 012345678",
    "message": "Hello, world!"
  }
]
Name |
Data Type |
Description |
|---|---|---|
|
String |
Phone number of the receiver. |
|
String |
SMS message text. |
Configuration
{
  "shortMessageAgent": {
    "host": "10.59.0.40",
    "port": 1432
  }
}
Name |
Data Type |
Description |
|---|---|---|
|
String |
Socket host (IP address or FQDN). |
|
Integer |
Socket port. |
Port
BluetoothPort
The BluetoothPort can be used for RFCOMM serial communication. The module initiates a socket connection to a sensor by using the native Bluetooth support of Python 3.3. At the moment, the module is experimental and needs further testing. It may be easier to use the Bluetooth driver to mount the Bluetooth port as a local serial port.
Loading the Module
Add the BluetoothPort to the modules section of the core configuration:
{
  "modules": {
    "bt3": "modules.port.BluetoothPort"
  }
}
Configuration
The configuration of BluetoothPort modules has to be placed in ports →
bluetooth → instance name, as shown below for the BluetoothPort instance
bt3.
{
  "ports": {
    "bluetooth": {
      "bt3": {
        "port": 3,
        "serverMacAddress": "5D:4F:4E:F4:55:FD"
      }
    }
  }
}
Name |
Data Type |
Description |
|---|---|---|
|
Integer |
Bluetooth port number. |
|
String |
MAC address of the Bluetooth server/sensor. |
SerialPort
The SerialPort module is used for the communication with sensors connected to a
serial interface (RS-232, RS-422, or RS-485). The requests defined in the
requestSets dictionary of the observation will be send one after another to
the sensor. The sensor’s responses are then each stored in the corresponding
request set. The SerialPort module also sets the time stamp of the observation
to the moment the last response has been received.
The SerialPort can communicate with an attached sensor either in active or passive mode:
- active
The port sends actively commands to a connected sensor in order to receive responses (default mode).
- passive
The port listens passively for incoming data of a connected sensor (must be activated by an observation).
An observation can demand passive mode by setting its key passiveMode to
true. The passive mode can be left by a further observation with
passiveMode set to false. In passive mode, the serial port module
creates new observations as fast as incoming data from a sensor is received. As
a prerequisite it is required that the one and only request set of the
observation is named draft, for instance:
{
  "sensors": {
    "thermometer": {
      "description": "example of a thermometer in passive mode",
      "type": "thermometer",
      "observations": [
        {
          "name": "getTemperature",
          "description": "get temperature",
          "id": "9dd4ac4d872547028bc287c66f64b8b0",
          "target": "temp",
          "receivers": [
            "com1",
            "preProcessor"
          ],
          "nextReceiver": 0,
          "enabled": true,
          "onetime": true,
          "passiveMode": true,
          "requestsOrder": [
            "draft"
          ],
          "requestSets": {
            "draft": {
              "enabled": true,
              "request": "",
              "responseDelimiter": "\r\n",
              "responsePattern": "(?P<temp>[+-]?\\d+\\.\\d+)",
              "sleepTime": 0.0,
              "timeout": 1.0
            }
          },
          "responseSets": {
            "temp": {
              "type": "float",
              "unit": "degC"
            }
          },
          "sleepTime": 0.0
        }
      ]
    }
  }
}
Loading the Module
Add the SerialPort to the modules section of the core configuration:
{
  "modules": {
    "com1": "modules.port.SerialPort",
    "com2": "modules.port.SerialPort"
  }
}
Configuration
In contrast to other modules, the configuration of SerialPort modules has to be
placed in ports → serial → instance name, as shown below for the
SerialPort instances com1 and com2.
{
  "ports": {
    "serial": {
      "com1": {
        "port": "COM1",
        "baudRate": 9600,
        "byteSize": 8,
        "stopBits": 1,
        "parity": "none",
        "timeout": 2,
        "softwareFlowControl": false,
        "hardwareFlowControl": false,
        "maxAttempts": 1
      },
      "com2": {
        "port": "COM2",
        "baudRate": 4800,
        "byteSize": 7,
        "stopBits": 2,
        "parity": "even",
        "timeout": 2,
        "softwareFlowControl": false,
        "hardwareFlowControl": false,
        "maxAttempts": 1
      }
    }
  }
}
Name |
Data Type |
Description |
|---|---|---|
|
String |
Name of the port ( |
|
Integer |
Baud rate (e.g., |
|
Integer |
Start bits, either |
|
Integer |
Stop bits, either |
|
String |
Parity, either |
|
Float |
Timeout in seconds. |
|
Boolean |
XON/XOFF flow control. |
|
Boolean |
RTS/CTS flow control. |
|
Integer |
Maximum number of attempts to access the port. |
Processing
PreProcessor
The PreProcessor module is used to extract values from a raw response of an
observation and convert them to given data types (i.e., from string to integer
or from string to float). Every observation object has both requestSets and
responseSets, with a regular expression stored in the response of each
request set. In order to extract single values from the raw response, so called
named groups have to be defined within the regular expressions (more
information). The groups are mapped by the PreProcessor module to the
according response sets.
Example
The sensor configuration of a fictional extensometer is listed below. The
request set getValues has the response pattern
(?P<distance>[-]?\\d\\.\\d+) with a named group distance in it. The
character \ has to be escaped in JSON, therefore it is written as \\.
The fitting response set distance expects the data type float. Note,
that group name and response set have the very same name (in this case
distance).
The value of group distance is extracted from the (raw) response
>+25.1203 by the PreProcessor using the regular expression, converted to
float, and then stored in the corresponding response set distance by adding
a key value to the dictionary, containing the actual measurement value
(25.1203).
The PreProcessor performs the following steps:
Read raw sensor data
>+25.1203from fieldresponseof request setgetValue.Extract
+25.1203using the (escaped) regular expression(?P<distance>[-]?\\d\\.\\d+).Convert the string
+25.1203to the float25.1203.Write value
25.1203to response setdistance.
The observation data object is then forwarded to the next receiver.
{
  "sensors": {
    "extensometer": {
      "description": "example of an extensometer",
      "type": "extensometer",
      "observations": [
        {
          "name": "doMeasure",
          "description": "get sensor value",
          "id": "6dc84c06018043ba84ac90636ed0f677",
          "target": "EXT",
          "receivers": [
            "com1",
            "preProcessor"
          ],
          "nextReceiver": 1,
          "enabled": true,
          "onetime": false,
          "passiveMode": false,
          "requestsOrder": [
            "getValue"
          ],
          "requestSets": {
            "getValue": {
              "enabled": true,
              "request": "?\r",
              "response": ">+25.1203",
              "responseDelimiter": "\r",
              "responsePattern": "(?P<distance>[+-]?\\d+\\.\\d+)",
              "sleepTime": 0,
              "timeout": 1
            }
          },
          "responseSets": {
            "distance": {
              "type": "float",
              "value": "25.1203",
              "unit": "mm"
            }
          },
          "sleepTime": 1
        }
      ]
    }
  }
}
Loading the Module
Add the PreProcessor to the modules section of the core configuration:
{
  "modules": {
    "preProcessor": "modules.processing.PreProcessor"
  }
}
Configuration
The module PreProcessor has nothing to configure.
ResponseValueInspector
The ResponseValueInspector checks if response values of observations are within defined thresholds. It works by checking received observations against the allowed minimum and maximum values of responses defined in the configuration. A log messages of level “critical” will be raised if a response value deceeds the minimum or exceeds the maximum.
Example
The response slopeDist of an arbitrary observation getDistance should be
between definied lower and upper boundaries. The minimum distance allowed is 2.0
m, the maximum is 300.0 m. Add the name of the observation to the configuration
of the module and set the min and max values of the response
slopeDist to the designated values:
{
  "responseValueInspector": {
    "observations": {
      "getDistance": {
        "slopeDist": {
          "min": 2.0,
          "max": 300.0
        }
      }
    }
  }
}
The ResponseValueInspector can be used to watch directions, angles, and other numerical values (integer or float) as well.
Loading the Module
Add the ResponseValueInspector to the modules section of the core configuration:
{
  "modules": {
    "responseValueInspector": "modules.processing.ResponseValueInspector"
  }
}
Configuration
{
  "responseValueInspector": {
    "observations": {
      "<observationName>": {
        "<responseName>": {
          "min": 20.0,
          "max": 300.0
        }
      }
    }
  }
}
Name |
Data Type |
Description |
|---|---|---|
|
Object |
Observations with response names and there minimum and maximum values. |
|
Float |
Minimum value of the response. |
|
Float |
Maximum value of the response. |
ReturnCodeInspector
The ReturnCodeInspector module generates log messages out of responses of sensors of Leica Geosystems. Generally, every response of a sensor of Leica Geosystem contains a so called return code, a decimal number which reveals further information about the sensor or the measurement.
The return codes and their descriptions are hard-coded into the module, as well as the log level (debug, info, warning, error, critical) and the setting whether or not a failed measurement should be repeated. The number of retries and the names of return code response sets can be defined in the configuration.
Example
In the example below, an observation of a total station is listed. The response
pattern of the request set getSensorId contains a named group
returnCode, which will be mapped to the corresponding response set
returnCode by the PreProcessor module. The ReturnCodeInspector checks the
response sets with the key returnCode. If the return code is greater 0
it will generate a log message.
{
  "name": "initialize",
  "description": "initialize the sensor",
  "receivers": [
    "preProcessor",
    "returnCodeInspector"
  ],
  "nextReceiver": 0,
  "enabled": true,
  "onetime": true,
  "sleepTime": 5,
  "target": "init",
  "requestSets": {
    "getSensorId": {
      "enabled": true,
      "request": "%R1Q,5003:\r\n",
      "responsePattern": "(?:%R1P,0,0:)(?P<returnCode>\\d+)(?:,(?P<sensorId>\\d+))?",
      "responseDelimiter": "\r\n",
      "sleepTime": 0.5,
      "timeout": 30
    }
  },
  "requestsOrder": [
    "getSensorId"
  ],
  "responseSets": {
    "returnCode": {
      "type": "integer",
      "unit": "none",
      "value": 7
    },
    "sensorId": {
      "type": "string",
      "unit": "none",
      "value": 9999999
    }
  }
}
Loading the Module
Add the ReturnCodeInspector to the modules section of the core configuration:
{
  "modules": {
    "returnCodeInspector": "modules.processing.ReturnCodeInspector"
  }
}
Configuration
{
  "returnCodeInspector": {
    "retries": 3,
    "responseSets": [
      "returnCode",
      "returnCodeSetDirection"
    ]
  }
}
Name |
Data Type |
Description |
|---|---|---|
|
Integer |
Number of retries after a failed observation. |
|
Array |
List of return code response set names to search for. |
UnitConverter
The UnitConverter module can be used to convert observation values from one unit
to another. For instance, a given distance in millimetres can be converted to
metres by scaling it with the factor 0.001. Add a definition to the
configuration of the module for each response you want to convert. The name of
the response is used as an identifier in the configuration.
Loading the Module
Add the UnitConverter to the modules section of the core configuration:
{
  "modules": {
    "unitConverter": "modules.processing.UnitConverter"
  }
}
Configuration
The configuration below shows the definition of a unit conversion from mm to
m for a response set with the name slopeDist.
{
  "unitConverter": {
    "slopeDist": {
      "conversionType": "scale",
      "sourceUnit": "mm",
      "scalingValue": 0.01,
      "targetUnit": "m"
    }
  }
}
Name |
Data Type |
Description |
|---|---|---|
|
String |
Currently, only the conversion type |
|
String |
Unit of the source value (e.g., |
|
String |
New unit of the result value (e.g., |
|
Float |
Scaling value (e.g., |
Prototype
All OpenADMS Node modules are a subclass of the module core.Prototype.
Prototype
The Prototype class is used for prototypal inheritance only. All OpenADMS Node modules are based on Prototype. A minimal OpenADMS Node module can be implemented as:
class MyModule(Prototype):

    def __init__(self, module_name: str, module_type: str, manager: Manager):
        super().__init__(module_name, module_type, manager)

    def process_observation(self, obs: Observation) -> Observation:
        return obs
The (processed) Observation object has always to be returned to the calling
routine. Please be aware that the function process_observation() runs
already inside a Thread.
Raspberry Pi
Modules in this package are compatible with the Raspberry Pi single-board computer running Linux only.
InterruptCounter
The InterruptCounter counts interrupts on one of the GPIO pins of the Raspberry Pi single-board computer. This module should be compatible with all Raspberry Pi models and ARMv6/ARMv7-based Linux operating systems. It is necessary to install the Python package RPi.GPIO before using InterruptCounter. Please run:
$ python3 -m pip install RPi.GPIO
Loading the Module
Add the InterruptCounter to the modules section of the core configuration:
{
  "modules": {
    "interruptCounter": "modules.rpi.InterruptCounter"
  }
}
Configuration
{
  "interruptCounter": {
    "gpio": 4,
    "bounceTime": 250,
    "countTime": 60,
    "receiver": "fileExporter",
    "sensorName": "Tipping Spoon"
  }
}
Name |
Data Type |
Description |
|---|---|---|
|
Integer |
GPIO pin to observe. |
|
Integer |
Time to wait after each interrupt to prevent bouncing (in milliseconds). |
|
Float |
Collection time (in seconds). |
|
String |
Name of the receiving module. |
|
String |
Name of the connected sensor. |
Schedule
Scheduler
The Scheduler module coordinates the monitoring process by following a schedule with start and end time to send observations to a defined sensor. It is mandatory to create a scheduler for each (serial) port instance to start a deformation monitoring.
The Scheduler works as a facilitator between the sensor and the port.
Observations of a sensor listed in observations are send one by one to the
bind port instance, using the according schedule.
Loading the Module
Add the Scheduler to the modules section of the core configuration:
{
  "modules": {
    "schedulerCom1": "modules.schedule.Scheduler",
    "schedulerCom2": "modules.schedule.Scheduler"
  }
}
The name of each instance can be chosen freely.
Configuration
Schedulers are configured separately in the schedulers section of the
configuration, defined by the name of the respective module instance (e.g.,
schedulerCom1, schedulerCom2, and so on).
{
  "schedulers": {
    "schedulerCom1": {
      "port": "com1",
      "sensor": "leicaTm30",
      "schedules": [
        {
          "enabled": true,
          "startDate": "2016-02-01",
          "endDate": "2017-07-30",
          "weekdays": {
            "monday": [
              {
                "startTime": "00:00:00",
                "endTime": "08:00:00"
              },
              {
                "startTime": "10:00:00",
                "endTime": "23:59:59"
              }
            ],
            "tuesday": [],
            "wednesday": [],
            "thursday": [],
            "friday": [],
            "saturday": [],
            "sunday": []
          },
          "observations": [
            "doInit",
            "getTargetP1",
            "getTargetP2",
            "getTargetP3"
          ]
        }
      ]
    },
    "schedulerCom2": {
      "port": "com2",
      "sensor": "stsDtm",
      "schedules": [
        {
          "enabled": true,
          "startDate": "2016-02-01",
          "endDate": "2017-07-30",
          "weekdays": {},
          "observations": [
            "getValues"
          ]
        }
      ]
    }
  }
}
Name |
Data Type |
Description |
|---|---|---|
|
String |
Name of the port module instance (e.g., |
|
String |
Name of the sensor as defined in |
|
Array |
List of schedules. |
Server
LocalControlServer
The LocalControlServer provides a simple web-based user interface for remote control that can be accessed with a browser (see Fig. 8). The module shows some project information, system parameters, loaded modules, used sensors, and log messages.
Warning
The web interface does not feature any kind of authentication or password protection. For public Internet access it is strongly recommended to run a reverse proxy server, like nginx or Hiawatha, in front of OpenADMS Node.
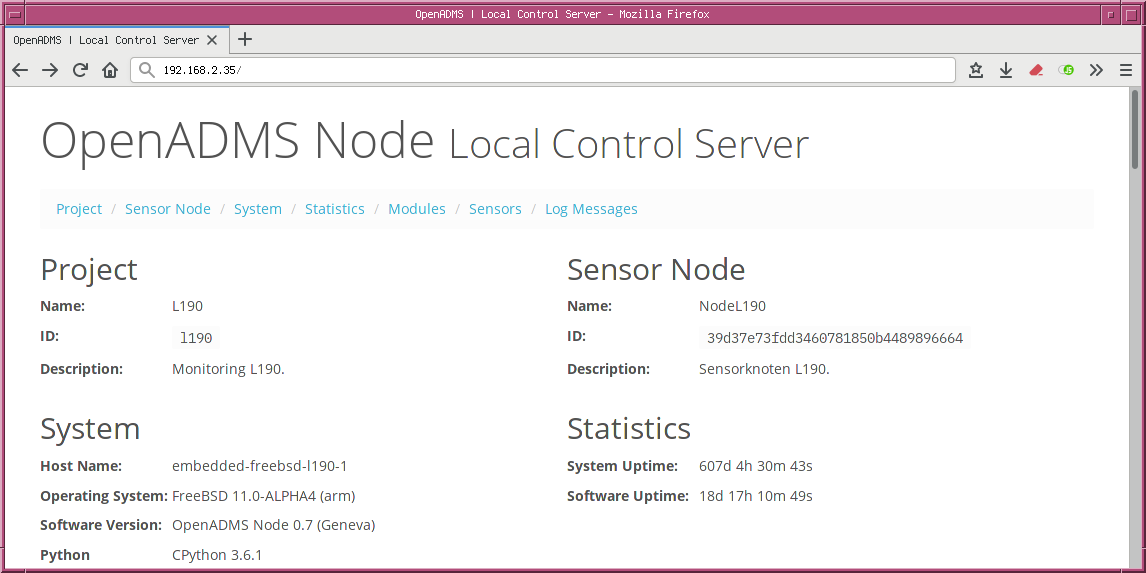
Fig. 8 The web-based user interface of the LocalControlServer
Loading the Module
Add the LocalControlServer to the modules section of the core configuration:
{
  "modules": {
    "localControlServer": "modules.server.LocalControlServer"
  }
}
Configuration
{
  "localControlServer": {
    "host": "127.0.0.1",
    "port": 8080
  }
}
Name |
Data Type |
Description |
|---|---|---|
|
String |
FQDN or IP address. Use a public IP or |
|
Integer |
Port number (e.g., |
Testing
Modules in this package are used to test the monitoring system.
ErrorGenerator
The ErrorGenerator creates log messages in a set interval. The module can be used to test the processing of warning, error, and critical log messages.
Loading the Module
Add the ErrorGenerator to the modules section of the core configuration:
{
  "modules": {
    "errorGenerator": "modules.testing.ErrorGenerator"
  }
}
Configuration
{
  "errorGenerator": {
    "warning": true,
    "error": false,
    "critical": false,
    "interval": 30
  }
}
Name |
Data Type |
Description |
|---|---|---|
|
Boolean |
Turns log messages of level “warning” on or off. |
|
Boolean |
Turns log messages of level “error” on or off. |
|
Boolean |
Turns log messages of level “critical” on or off. |
|
Float |
Interval in which new log messages are generated. |
Totalstation
DistanceCorrector
The DistanceCorrector module applies atmospheric and sea level reductions to measured EDM distances of total stations.
The atmospheric correction uses temperature, pressure, and humidity to calculate
the reduced distance. The values can be updated by sending observations of a
weather station to the DistanceCorrector. The response sets must have the names
temperature, pressure, and humidity to be noticed by the module. The
calculated atmospheric PPM value is stored in the response set
atmosphericPpm of the observation.
The sea level correction reduces the distance to sealevel (0 m). The calculated
sea level delta value is stored in the response set seaLevelDelta of the
observation.
The name of the response set of the distance can be set in the configuration.
The raw distance is moved to a new response set with the postfix Raw (e.g.,
the raw response set slopeDist is moved to slopeDistRaw). The original
response set gets overwritten by the corrected value (slopeDist then stores
the corrected distance).
Loading the Module
Add the DistanceCorrector to the modules section of the core configuration:
{
  "modules": {
    "distanceCorrector": "modules.totalstation.DistanceCorrector"
  }
}
Configuration
{
  "distanceCorrector": {
    "distanceName": "slopeDist",
    "temperature": 20.0,
    "pressure": 1010.0,
    "humidity": 0.6,
    "atmosphericCorrectionEnabled": true,
    "seaLevelCorrectionEnabled": false,
    "sensorHeight": 100.0,
  }
}
Name |
Data Type |
Description |
|---|---|---|
|
String |
Name of the response set of the raw distance. |
|
Float |
Default temperature in °C. |
|
Float |
Default pressure in mbar/hPa. |
|
Float |
Default humidity between |
|
Boolean |
Enables atmospheric correction of distances. |
|
Boolean |
Enables sea level reduction of distances. |
|
Float |
Sensor height for sealevel reduction. |
HelmertTransformer
The HelmertTransformer module does a distortion-free seven-parameter transformation from one datum to another in order to calculate the view point of a total station and the coordiantes of observed target points. The coordinates of the fixed points must be defined in the configuration.
An observation will be created for the view point and send to a list of
receivers. The calculated coordinates of the target points are stored as
response sets in the observations (x, y, and z).
Note
Please be aware that the keys of the fixed points defined in the dictionary
fixedPoints must match the target names of the actual fixed points
observed by the total station. Otherwise, an assignment between them is not
possible.
Loading the Module
Add the HelmertTransformer to the modules section of the core configuration:
{
  "modules": {
    "helmertTransformer": "modules.totalstation.HelmertTransformer"
  }
}
Configuration
{
  "helmertTransformer": {
    "residualMismatchTransformationEnabled": true,
    "viewPoint": {
      "target": "p6",
      "receivers": [
        "fileExporter"
      ]
    },
    "fixedPoints": {
      "p1": {
        "x": 2000,
        "y": 1000,
        "z": 100
      },
      "p2": {
        "x": 1995.488,
        "y": 1003.768,
        "z": 100.008
      },
      "p3": {
        "x": 1994.49,
        "y": 996.26,
        "z": 100.021
      }
    }
  }
}
Name |
Data Type |
Description |
|---|---|---|
|
Boolean |
Prorate residuals between the target points. |
|
Object |
Target names and receivers of the view point. |
|
Object |
Target names and coordinates of the fixed points. |
PolarTransformer
The PolarTransformer module is used to calculate polar coordinates from
Cartesian coordinates. The position of the sensor and the azimuth must be
defined in the configuration. The coordinates of a target point (x, y,
and z) are calculated by using trigonometric functions and then saved as
response sets in the observation.
Loading the Module
Add the PolarTransformer to the modules section of the core configuration:
{
  "modules": {
    "polarTransformer": "modules.totalstation.PolarTransformer"
  }
}
Configuration
{
  "polarTransformer": {
    "viewPoint": {
      "x": 2000,
      "y": 992.51,
      "z": 100
    },
    "fixedPoints": {
      "p1": {
        "x": 2000,
        "y": 1000,
        "z": 100
      },
      "p2": {
        "x": 1995.488,
        "y": 1003.768,
        "z": 100.008
      },
      "p3": {
        "x": 1994.49,
        "y": 996.26,
        "z": 100.021
      }
    },
    "azimuthPointName": "p1",
    "azimuthAngle": 100,
    "adjustmentEnabled": true
  }
}
Name |
Data Type |
Description |
|---|---|---|
|
Object |
Coordinates of the sensor position ( |
|
Object |
Coordinates of the fixed points ( |
|
Object |
Name of the fixed point that sets the azimuth. |
|
Object |
Global azimuth in gon. Set to |
|
Object |
Turns the adjustment of the orientation using more than one fixed point on or off (in German: Abriss). |
RefractionCorrector
RefractionCorrector removes the influence of the refraction from a measured distance and corrects the Z value of an observed target.
Loading the Module
Add the RefractionCorrector to the modules section of the core configuration:
{
  "modules": {
    "refractionCorrector": "modules.totalstation.RefractionCorrector"
  }
}
Configuration
The module RefractionCorrector has nothing to configure.
SerialMeasurementProcessor
The SerialMeasurementProcessor is used for total station observations in two
faces. The response sets of the first face have to be named hz0, v0, and
slopeDist0, whereas the response sets of the second face must be hz1,
v1, and slopeDist1. The module creates a new response set inside the
observation object for each arithmetically averaged value (named hz, v,
and slopeDist).
An appropriate requests order is necessary for a measurement in two faces:
Set the direction to the target.
Do measure in face 0.
Get the measured values (
hz0,v0,slopeDist0, etc.).Change the total station to face 1.
Do measure face 1.
Get the measured values (
hz1,v1,slopeDist1, etc.).Change the total station back to face 0.
Example
The example shows a measurement with the Leica TM30 total station in two faces. Both measurements, in face 0 and face 1, are done in one observation, with response sets for each face.
{
  "name": "getP1",
  "target": "p1",
  "description": "complete measurement of P1",
  "enabled": true,
  "nextReceiver": 0,
  "onetime": false,
  "receivers": [
    "preProcessor",
    "returnCodeInspector",
    "serialMeasurementProcessor",
    "distanceCorrector",
    "polarTransformer",
    "fileExporter"
  ],
  "requestSets": {
    "changeFace": {
      "enabled": true,
      "request": "%R1Q,9028:1,1,0\r\n",
      "responseDelimiter": "\r\n",
      "responsePattern": "(?:%R1P,0,0:)(?P<rcChangeFace>\\d+)",
      "sleepTime": 0,
      "timeout": 30
    },
    "getFace0": {
      "enabled": true,
      "request": "%R1Q,2026:\r\n",
      "responseDelimiter": "\r\n",
      "responsePattern": "(?:%R1P,0,0:)(?P<rcGetFace0>\\d+)(?:,(?P<face0>\\d+))?",
      "sleepTime": 0,
      "timeout": 30
    },
    "getFace1": {
      "enabled": true,
      "request": "%R1Q,2026:\r\n",
      "responseDelimiter": "\r\n",
      "responsePattern": "(?:%R1P,0,0:)(?P<rcGetFace1>\\d+)(?:,(?P<face1>\\d+))?",
      "sleepTime": 0,
      "timeout": 30
    },
    "getValuesFace0": {
      "enabled": true,
      "request": "%R1Q,2167:5000,1\r\n",
      "responseDelimiter": "\r\n",
      "responsePattern": "(?:%R1P,0,0:)(?P<rcGetValues0>\\d+)(?:,(?P<hz0>\\d*\\.?\\d+),(?P<v0>\\d*\\.?\\d+),(?P<accAngle0>-?\\d*\\.?\\d+),(?P<c0>-?\\d*\\.?\\d*),(?P<l0>-?\\d*\\.?\\d*),(?P<accIncl0>-?\\d*\\.?\\d*),(?P<slopeDist0>\\d*\\.?\\d*),(?P<distTime0>-?\\d*))?",
      "sleepTime": 0,
      "timeout": 30
    },
    "getValuesFace1": {
      "enabled": true,
      "request": "%R1Q,2167:5000,1\r\n",
      "responseDelimiter": "\r\n",
      "responsePattern": "(?:%R1P,0,0:)(?P<rcGetValues1>\\d+)(?:,(?P<hz1>\\d*\\.?\\d+),(?P<v1>\\d*\\.?\\d+),(?P<accAngle1>-?\\d*\\.?\\d+),(?P<c1>-?\\d*\\.?\\d*),(?P<l1>-?\\d*\\.?\\d*),(?P<accIncl1>-?\\d*\\.?\\d*),(?P<slopeDist1>\\d*\\.?\\d*),(?P<distTime1>-?\\d*))?",
      "sleepTime": 0,
      "timeout": 30
    },
    "measureDistanceFace0": {
      "enabled": true,
      "request": "%R1Q,2008:1,1\r\n",
      "responseDelimiter": "\r\n",
      "responsePattern": "(?:%R1P,0,0:)(?P<rcMeasureDistance0>\\d+)",
      "sleepTime": 0,
      "timeout": 30
    },
    "measureDistanceFace1": {
      "enabled": true,
      "request": "%R1Q,2008:1,1\r\n",
      "responseDelimiter": "\r\n",
      "responsePattern": "(?:%R1P,0,0:)(?P<rcMeasureDistance1>\\d+)",
      "sleepTime": 0,
      "timeout": 30
    },
    "setDirection": {
      "enabled": true,
      "request": "%R1Q,9027:0.0,1.59115,2,1,0\r\n",
      "responseDelimiter": "\r\n",
      "responsePattern": "(?:%R1P,0,0:)(?P<rcSetDirection>\\d+)",
      "sleepTime": 2,
      "timeout": 30
    }
  },
  "requestsOrder": [
    "setDirection",
    "getFace0",
    "measureDistanceFace0",
    "getValuesFace0",
    "changeFace",
    "getFace1",
    "measureDistanceFace1",
    "getValuesFace1",
    "changeFace"
  ],
  "responseSets": {
    "accAngle0": {
      "type": "float",
      "unit": "rad"
    },
    "accAngle1": {
      "type": "float",
      "unit": "rad"
    },
    "accIncl0": {
      "type": "float",
      "unit": "rad"
    },
    "accIncl1": {
      "type": "float",
      "unit": "rad"
    },
    "c0": {
      "type": "float",
      "unit": "rad"
    },
    "c1": {
      "type": "float",
      "unit": "rad"
    },
    "distTime0": {
      "type": "integer",
      "unit": "ns"
    },
    "distTime1": {
      "type": "integer",
      "unit": "ns"
    },
    "face0": {
      "Type": "integer",
      "unit": "none"
    },
    "face1": {
      "type": "integer",
      "Unit": "none"
    },
    "hz0": {
      "type": "float",
      "unit": "rad"
    },
    "hz1": {
      "type": "float",
      "unit": "rad"
    },
    "l0": {
      "type": "float",
      "unit": "rad"
    },
    "l1": {
      "type": "float",
      "unit": "rad"
    },
    "rcChangeFace": {
      "type": "integer",
      "unit": "none"
    },
    "rcGetFace0": {
      "type": "integer",
      "unit": "none"
    },
    "rcGetFace1": {
      "type": "integer",
      "unit": "none"
    },
    "rcGetValues0": {
      "type": "integer",
      "unit": "none"
    },
    "rcGetValues1": {
      "type": "integer",
      "unit": "none"
    },
    "rcMeasureDistance0": {
      "type": "integer",
      "unit": "none"
    },
    "rcMeasureDistance1": {
      "type": "integer",
      "unit": "none"
    },
    "rcSetDirection": {
      "type": "integer",
      "unit": "none"
    },
    "slopeDist0": {
      "type": "float",
      "unit": "m"
    },
    "slopeDist1": {
      "type": "float",
      "unit": "m"
    },
    "v0": {
      "type": "float",
      "unit": "rad"
    },
    "v1": {
      "type": "float",
      "unit": "rad"
    }
  },
  "sleepTime": 25
}
Loading the Module
Add the SerialMeasurementProcessor to the modules section of the core
configuration:
{
  "modules": {
    "serialMeasurementProcessor": "modules.totalstation.SerialMeasurementProcessor"
  }
}
Configuration
The module SerialMeasurementProcessor has nothing to configure.
Unix
Modules in the Unix package can be used on selected Unix operating systems only, for example, FreeBSD, DragonFly BSD, NetBSD, and OpenBSD. This limitation may be due to dependencies or system calls that are available on Unix only. In general, modules of the Unix package are not compatible with Linux. Further restrictions may apply.
GpioController
The GpioController uses system tools of FreeBSD, NetBSD, and OpenBSD to control
the GPIO interface of the Raspberry Pi single-board computer. The state of a
single pin can be set to either 0 or 1 in order to control external
devices or relays. The pin is switched by sending a message of type gpio to
the module instance. After the set duration the pin changes back to the default.
Loading the Module
Add the GpioController to the modules section of the core configuration:
{
  "modules": {
    "gpioController": "modules.unix.GpioController"
  }
}
GPIO Message Format
The messages have to be structured in JSON format:
[
  {
    "type": "gpio"
  },
  {
    "value": "1"
  }
]
Name |
Data Type |
Description |
|---|---|---|
|
String |
Value to set the pin to (e.g., |
Configuration
{
  "gpioController": {
    "defaultState": 0,
    "duration": 5.0,
    "pin": "pin_17"
  }
}
Name |
Data Type |
Description |
|---|---|---|
|
Integer |
Default state of the pin (either |
|
Float |
Duration of the state change. |
|
String |
Name of the pin defined in the GPIO configuration of the OS. |
Virtual
OpenADMS supports virtual sensors, which simulate physical ones. The logic of
the virtual sensors is stored in single modules in the file
module/virtual.py. The Python class VirtualSensor is the parent class
for the inheritance of new sensors.
VirtualDTM
The VirtualDTM simulates an STS DTM temperature/pressure sensor. The virtual sensor returns random temperature values between –20 and +40 °C as well as random pressure values between 980 and 1150 hPa.
The VirtualDTM can be used like a real sensor. Create a Scheduler and set the name of the sensor to the name of the VirtualDTM instance.
Loading the Module
Add the VirtualDTM to the modules section of the core configuration:
{
  "modules": {
    "virtualDtm": "modules.virtual.VirtualDTM"
  }
}
Configuration
The module VirtualDTM has nothing to configure.
VirtualIndicatorOne
The VirtualIndicatorOne simulates a Sylvac S_Dial ONE digital indicator/extensometer. The virtual sensor returns values of a sine wave between 0.0 and 26.0 mm (measurement range of the physical sensor).
The virtual sensor can be used like a real one. Create a Scheduler and set the name of the sensor to the name of the VirtualIndicatorOne instance.
Loading the Module
Add the VirtualIndicatorOne to the modules section of the core
configuration:
{
  "modules": {
    "virtualIndicatorOne": "modules.virtual.VirtualIndicatorOne"
  }
}
Configuration
The module VirtualIndicatorOne has nothing to configure.
VirtualTotalStationTM30
The VirtualTotalStationTM30 simulates a Leica TM30 total station, but can also be used as any other modern total station of Leica Geosystems. The module returns just random data in defined ranges. The following Leica GeoCOM commands are implemented yet:
Return Code |
Description |
|---|---|
|
Measure the distance. |
|
Do a complete measurement and return the values. |
|
Get the sensor ID. |
|
Get the sensor name. |
|
Set the direction. |
More GeoCOM commands can be added easily. Later versions of the module may include further ones.
The VirtualTotalStationTM30 can be used like a real sensor. Create a Scheduler and set the name of the sensor to the name of the VirtualTotalStationTM30 instance.
Loading the Module
Add the VirtualTotalStationTM30 to the modules section of the core
configuration:
{
  "modules": {
    "virtualTotalStationTM30": "modules.virtual.VirtualTotalStationTM30"
  }
}
Configuration
The module VirtualTotalStationTM30 has nothing to configure.